Free Octagon Picnic Table Plans and Drawings
This pace by pace diy projection is about octagonal picnic table plans plans. I have designed this octagon picnic tabular array with an easy access to the seats so yous can finally create that unique identify for hanging out with the friends and family in your yard. This projection tin can exist completed in i weekend with mutual tools and materials you can notice at any DIY shop.
When buying the lumber, you should select the planks with great care, making certain they are directly and without whatsoever visible flaws (cracks, knots, twists, decay). Investing in cedar or other weather resistant lumber is a good idea, as it volition pay off on the long run. Utilise a spirit level to plumb and align the components, before inserting the galvanized screws, otherwise the project won't have a symmetrical look. If y'all take all the materials and tools required for the project, you could get the job done in well-nigh a day. Take a expect over the residue of mywoodworking plans, if you want to get more building inspiration. See all my Premium Plans Hither.
Projects made from these plans
Octagonal Picnic Tabular array Plans Gratis

Building-an-octagonal-picnic-table
[tabs tab1="Materials" tab2="Tools" tab3="Time" tab4="Related Plans"] [tab id=1]
- A – i piece of 2×4 lumber – 62″ long, 2 pieces – thirty ane/4″ long, 4 pieces – 30″ long SUPPORTS
- B – eight piece of 2×4 lumber – 26 1/8″ long, 8 piece of ii×4 lumber – 22 three/4″ long, 8 piece of ii×4 lumber – 19 i/2″ long, viii slice of two×iv lumber – 16 i/viii″ long, 8 piece of two×4 lumber – 12 vii/8″ long, 8 piece of 2×4 lumber – 9 1/2″ long, 8 piece of 2×4 lumber – 6 1/4″ long (22.v degree cuts at both ends), 1 piece – vii″x7″ long TABLETOP
- C – 4 pieces of 2×four lumber – 35″ long LEGS
- D – 2 pieces of 2×iv lumber – 95″ long, 2 pieces – 46 three/4″ long, 2 pieces – 43 three/4″ long SUPPORTS
- Due east – 8 pieces of two×4 lumber – 24″ long, 8 pieces – 22 one/4″ long, 16 pieces of one×2 lumber – 7 1/2″ long SEAT
- F – 8 pieces of 2×half-dozen lumber – 17″ long BRACES
- G – 4 pieces of 2×8 lumber – 23 1/2″ long Base of operations
- 3 pieces of 2×4 lumber – 12′
- 16 pieces of ii×4 lumber – 8′
- 1 piece of 2×6 lumber – 12′
- one slice of ii×8 lumber – 8′
- 8 pieces of 3 1/two″ carriage bolts
- viii pieces of v″ wagon bolts
- 100 pieces of 2 1/2″ pocket screws
- 100 pieces of 2 1/two″ screws
- 30 pieces of 1 5/eight″ screws
- wood filler , wood glue, stain/paint
[/tab] [tab id=2]
Hammer, Tape measure, Framing foursquare, Level
Miter saw, Drill machinery, Screwdriver, Sander
Condom Gloves, Safe Glasses
[/tab] [tab id=iii]
One day
[/tab][tab id=4]
- 6 foot picnic table plans
- Kids picnic table plans
[/tab][/tabs]
How to build an octagon picnic table
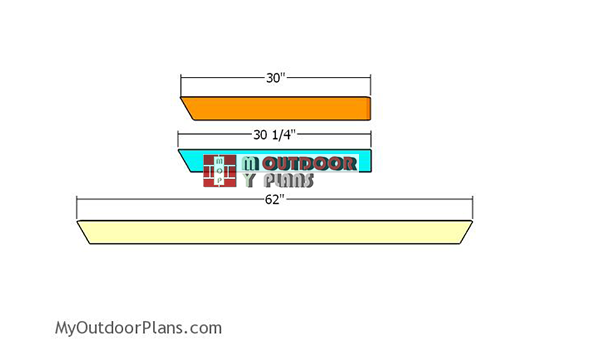
Tabletop-supports
The beginning footstep of the project is to build the frame for the tabletop. Mark the cut lines on the 2×four beams and and then get the chore done with a saw. Make 45 caste cuts to the beams, as shown in the diagram. Smooth the edges with 120-220 grit sandpaper.

Detail
Make double 45 caste cuts to the orange supports, as shown in the plans. Use a miter saw to make the angle cuts accurately. Marking the center of the board, then you can make the angle cuts accurately.

Assembling the tabletop
Fit the supports on a level surface and lock them together as shown in the diagram. First, drill pocket holes at both ends of the blue supports and then secure them to the center of the xanthous beam using 2 i/2″ screws. Adjacent, fit the orange supports, drill pilot holes and insert ii 1/2″ screws to lock them into place tightly.
Call back that this frame will be fifty-fifty more sturdy when yous'll assemble the picnic table, because every component will add strength.
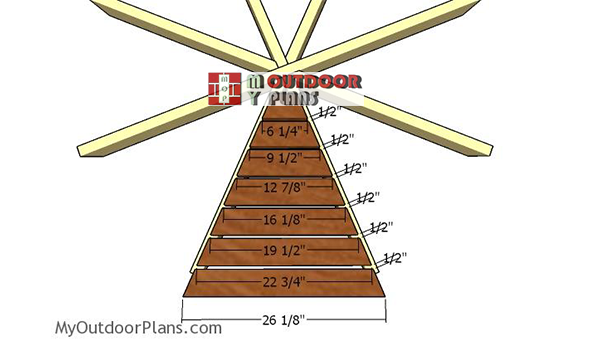
Tabletop-slats
Next step of the project is to cut the slats for the tabletop. Make 22.five degree cuts to both ends of the two×4 slats, post-obit the pattern in the diagram. Drill pocket holes at both ends of the slats, so you tin interlock them together tightly. Add mucilage to the joints and align the edges flush. Fit a piece of 1/2″ plywood between the slats, to create even gaps.

Centre slat
Build the central slat for the tabletop from 2×8 lumber or from 2 2x6s. Make the cuts to the slat using the data from the diagram. Smooth the edges with sandpaper.

Assembling the tabletop slats
After assembling the tabletop with 2 1/2″ screws, you demand to eye the supports into place, equally shown in the diagram. Adjacent, drill pilot holes through the sides of the supports and insert 2 one/2″ screws into the tabletop slats.
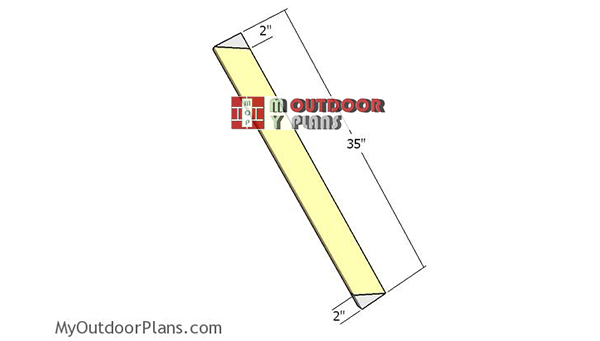
Building-the-legs-for-the-tabular array
Build the legs for the octagonal picnic table from 2×iv lumber, by making 30 degrees cuts to both ends. Smooth the edges with sandpaper.

Fitting the legs
Attach the legs to the frame of the tabletop, 4″ away from the end of the supports. Clamp the legs to the supports, drill pilot holes through both the legs and the supports and insert 3 1/2″ carriage bolts. Insert ii bolts for each joint.

Edifice the seat supports
The next step of the octagon picnic table is to build the frame for the seats. Cut the 2×4 beams as shown in the diagram and make 45 degree cuts to the ends. Drill pocket holes to the straight end of the blue and violet components and secure them to the yellow beams with 2 1/2″ screws. Marshal the edges flush and make sure the corners are square. Fit a scrap slice of 2×iv between the double boards, to create the i i/ii″ gaps.

Plumbing fixtures the seat supports
Fit the seat supports to the picnic tabular array, equally shown in the diagram. Clamp the supports to the legs, drill pilot holes through both the beams and the legs and insert 5″ wagon bolts. Insert two bolts for each joint for a professional result. Apply a spirit level to brand sure the supports are horizontal.

Building the base
Next, you need to build the seats for the picnic table. Start with the two×eight base by making decorative cuts to the ii corners.

Seat slats
Utilise 2×four lumber for the seat slats. Make 22.five degree cuts to ane end of the slats and then lay them on a level surface. Fit pieces of 1/2″ betwixt the slats, every bit shown in the plans.

Assembling the seat slats
Secure the slats together tightly with 1×two supports and i 5/viii″ screws. Drill pilot holes before inserting the screws to prevent the wood from splitting.

Diagonal supports
Use two×vi lumber for the diagonal braces for the seats. Use a miter saw to make 19 caste bevel cuts to the braces. Drill pocket holes at both ends.

Assembling the seats
The next step is to assemble the seats by locking all these components together. Use two i/2″ screws to secure the braces to the bottom slat and to the seat slats.

Particular
Notice how you should fit the braces into place.

Seats
Smooth the edges or employ a router to round-over the exposed edges.

Plumbing fixtures the seats
Fit the seats to the picnic table, as bear witness in the diagram. Middle the base of the seats to the legs. Drill airplane pilot holes through the legs and insert 2 1/2″ screws into the base of the slats. Afterwards, drill airplane pilot holes through the seat slats and insert ii 1/ii″ screws into the supports.

Octagonal picnic table plans – Elevation view
Last but non least, you lot need to take intendance of the finishing touches. Make full the holes with wood putty and let them harden for a few hours. Smooth the surface with 120-220 dust sandpaper and circular the exposed edges with a router. Apply a few coats of pigment or stain to protect the lumber from the elements and to enhance the look of the octagon picnic table.

Octagonal picnic table plans free
Don't forget to take a wait over the rest of my picnic table plans Here. If yous don't fancy this particular blueprint, you can choose from lots of other outdoor furniture plans I take on the site. Remember to adjust the size and the pattern of the projects to your needs and to accept fun during the process!
This woodworking project was nigh octagonal picnic tabular array plans gratis. If you want to see more outdoor plans, check out the rest of our footstep past pace projects and follow the instructions to obtain a professional upshot.
Source: https://myoutdoorplans.com/furniture/octagonal-picnic-table-plans-free/
0 Response to "Free Octagon Picnic Table Plans and Drawings"
Enviar um comentário